User Guide
System Requirements
| Item | Requirement |
|---|---|
| OS | Ubuntu 22.04 LTS (x86 or arm64) |
| CPU | Recommended: ≥ 14th-gen Intel Core i5, or ≥ 13th-gen Intel Core i7 equivalent (see Device Performance Requirements) |
| Memory | 16 GB or more recommended |
| ROS 2 | Humble (installed at /opt/ros/humble) |
| Network tools | curl (used by startup script health checks) |
| Browser | Head mode requires a modern browser (Chrome / Firefox / Edge, etc.) |
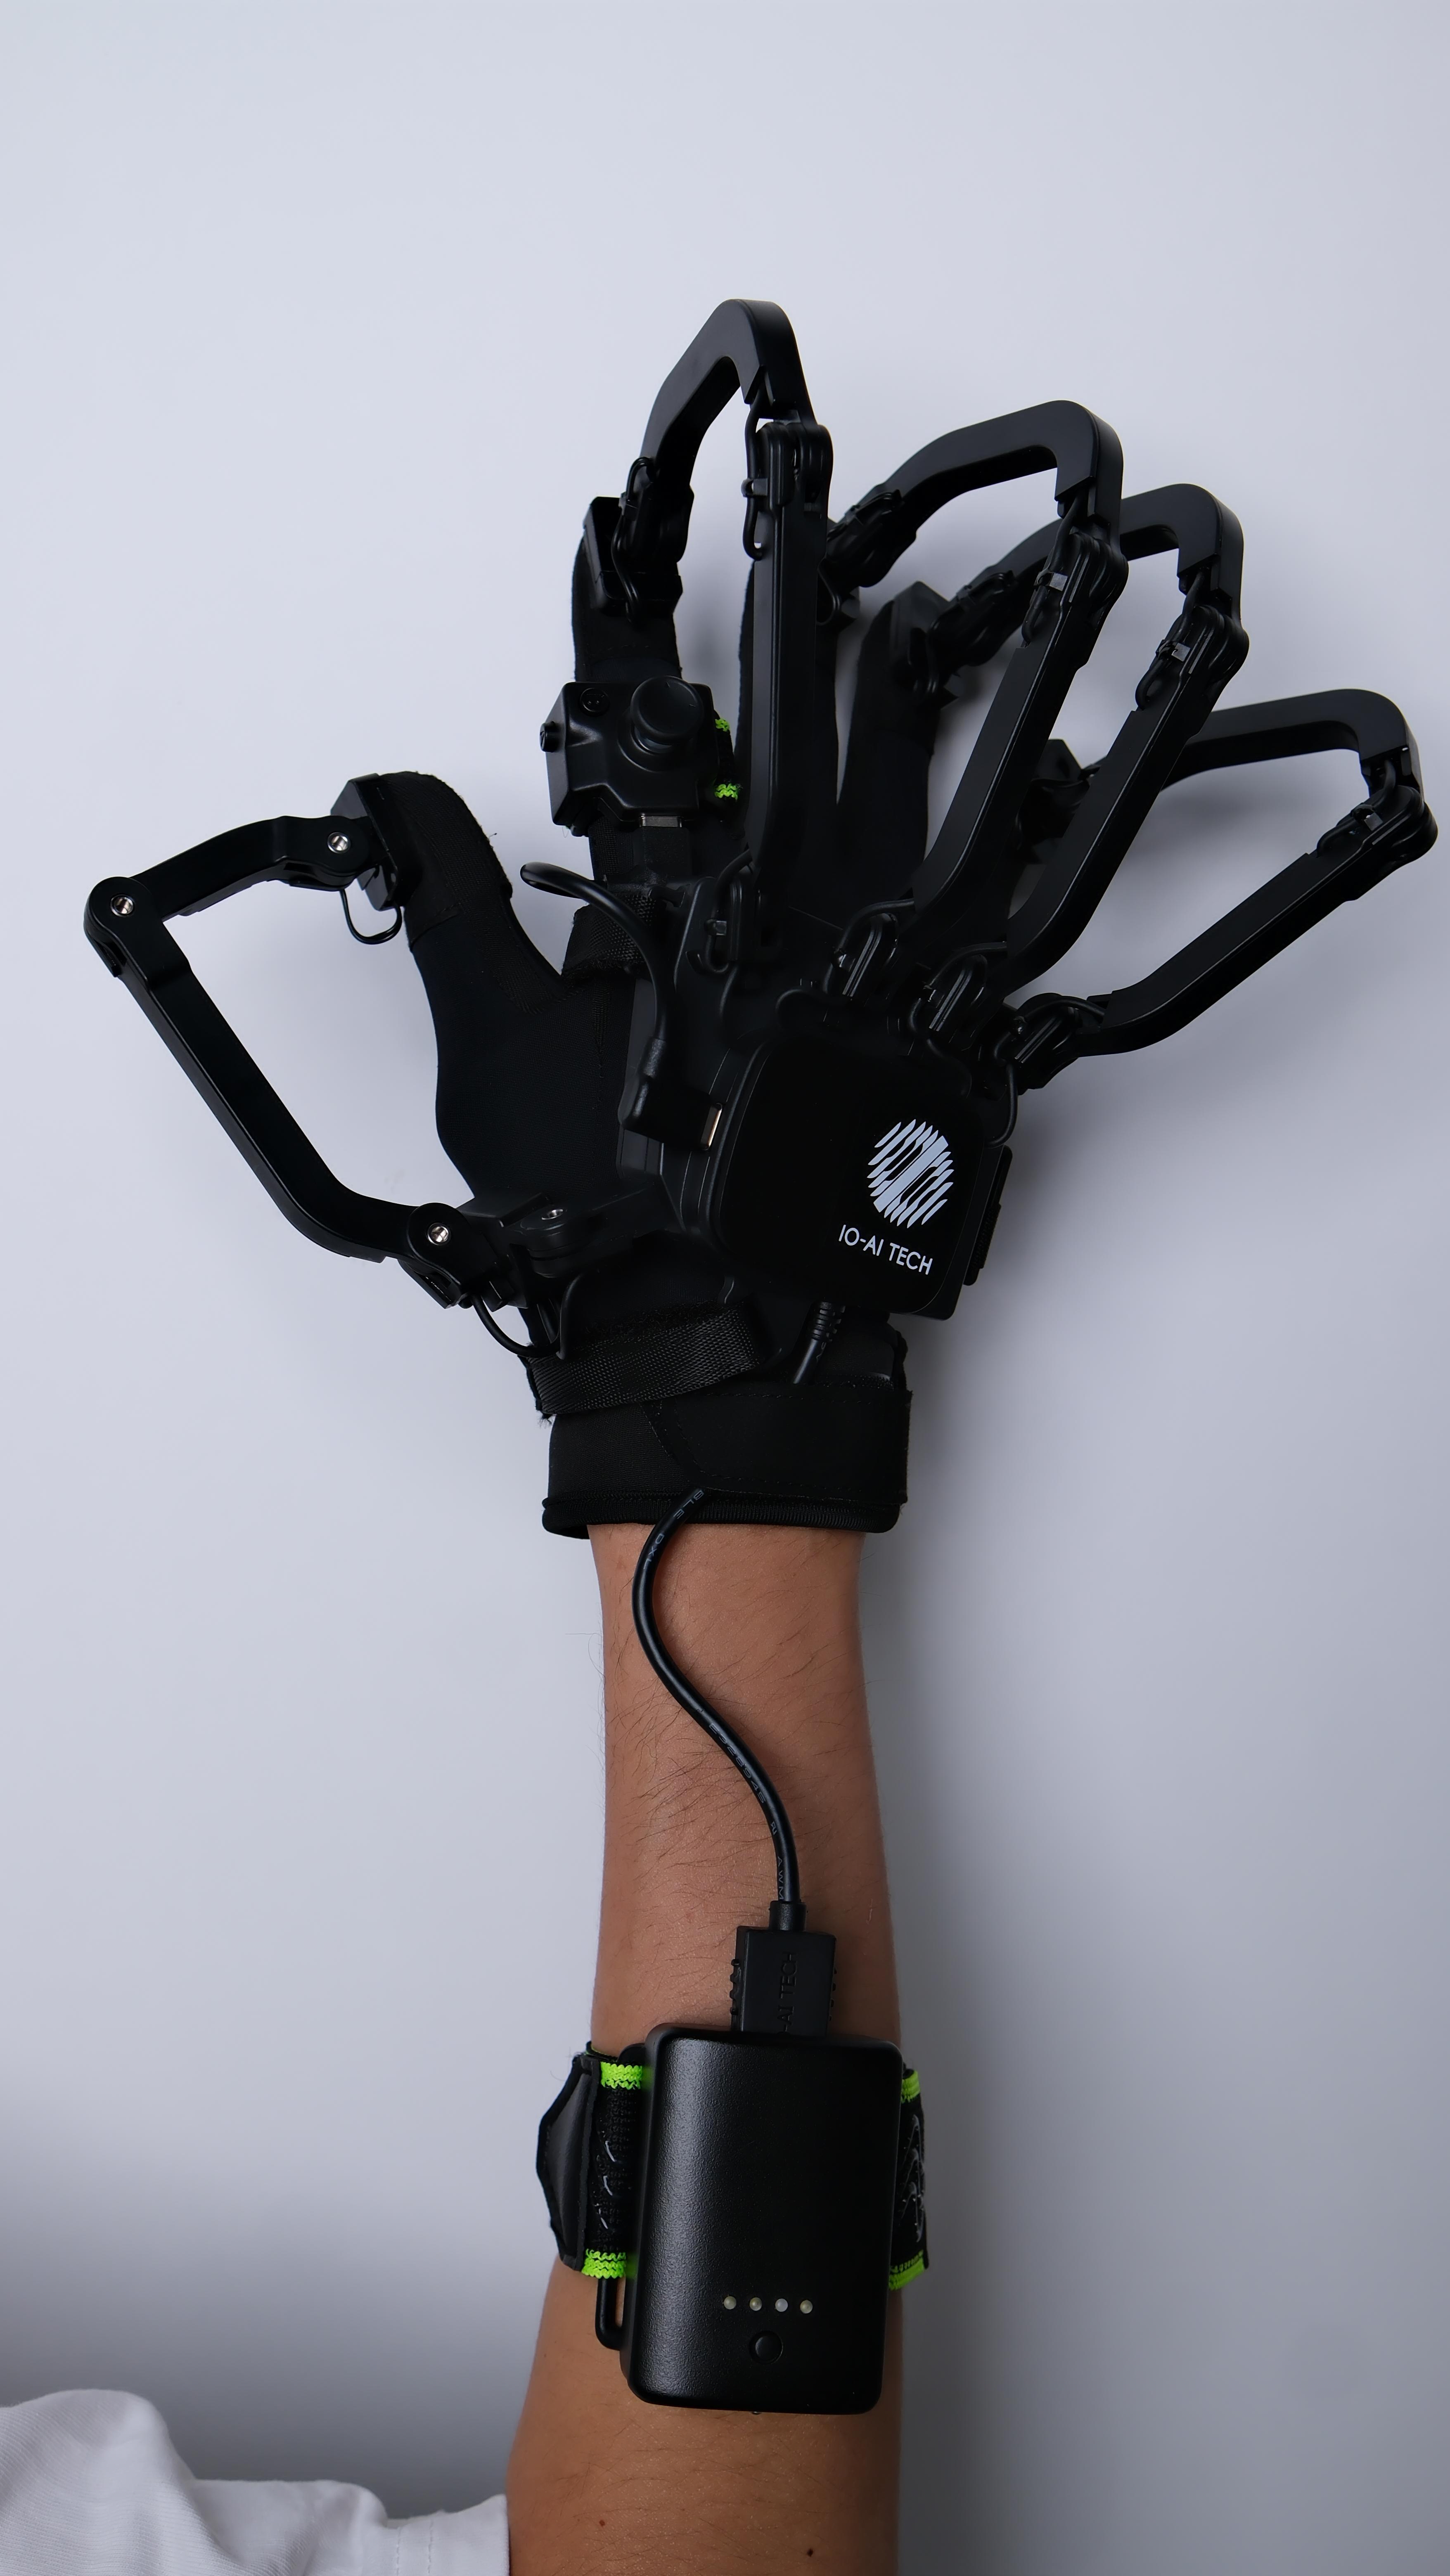
| Peripherals | Exoskeleton glove (USB serial or wired/wireless UDP); optional dexterous hand model configuration |
Note: Python 3.10, FastAPI, and numerical libraries are bundled in the
bundle/directory. No need to create a separate virtual environment or compile source code.
Device Performance Requirements (CPU)
This platform runs the gateway service and multiple ROS 2 subprocesses simultaneously; in Head mode it also drives web-based 3D visualization and real-time charts, which places high demands on CPU performance. Below the recommended configuration, you may experience UI lag, dropped frames in joint charts, or slow subprocess response.
The following guidelines may help:
| Tier | CPU reference | Notes |
|---|---|---|
| Recommended | 14th-gen Intel Core i5 or 13th-gen Intel Core i7 and above | Smoothly runs Head mode (including URDF visualization and real-time monitoring) |
| Acceptable | 13th-gen i5, 12th-gen i7, or equivalent | Headless mode is usually acceptable; Head mode visualization may occasionally stutter |
| Not recommended | Older laptops / low-power U-series below the above tier | Noticeable lag likely; not recommended for demos or production |
Pre-deployment Preparation
1. Install ROS 2 Humble
If ROS 2 Humble is not yet installed on the target machine, follow the ROS 2 Humble official documentation to install it, then verify the following file exists:
test -f /opt/ros/humble/setup.bash && echo "ROS Humble OK"
2. USB Serial Permission Setup for Wired Exoskeleton
Method 1 (recommended):
sudo chmod -R 777 /dev/ttyA*
sudo chmod -R 777 /dev/ttyU*
Method 2:
-
Add the current user to the
dialoutgroup and log out and back in for it to take effect:sudo usermod -aG dialout "$USER" -
It is recommended to install the project's bundled udev rules so that permissions are automatically restored after re-plugging the exoskeleton USB:
sudo cp configs/udev/99-io-exo-serial.rules /etc/udev/rules.d/sudo udevadm control --reload-rules && sudo udevadm trigger
3. Network Configuration Preparation for Wireless Exoskeleton
If you are using a wireless exoskeleton module, ensure the host has a 10.42.0.* subnet address. For detailed steps on wireless connection, please refer to the Wireless Connection section.
4. Extract and Set Permissions
cd /path/to/io_exotrans2hand_project_22.04_x86_v1.0.7
chmod +x scripts/*.sh
Directory Structure and Run Modes
The delivery package directory structure is as follows (subject to what you actually receive):
io_exotrans2hand_project_22.04_x86_vX.X.X/
├── scripts/
│   ├── run_gateway.sh       # Main startup script (head / headless)
│   ├── install-desktop.sh   # Install desktop shortcut
│   ├── bundle-env.sh        # Load bundle environment and ROS
│   └── bundle-ws-setup.bash # ROS workspace setup
├── configs/
│   ├── config/
│   │   ├── gateway.yaml     # Main gateway config (port, commands, data streams, etc.)
│   │   └── topics.yaml      # ROS topic params (exo_tf, etc.)
│   ├── end_tools/           # Dexterous hand model configs (extensible via upload)
│   ├── exoskeleton_urdf/    # Exoskeleton URDF and meshes
│   ├── udev/                # USB serial udev rules
│   └── IO.png               # App icon
├── src/
│   ├── io_gateway/          # Gateway service (Web / API / orchestration)
│   └── io_unicontroller/    # Dexterous hand controller scripts
├── bundle/                  # Prebuilt runtime (Python, ROS packages, dependency libraries)
├── logs/                    # Runtime logs (organized by date, auto-created on startup)
└── io-gateway.desktop       # Desktop shortcut template
This package provides two run modes:
| Mode | Use case | Web UI | How to launch |
|---|---|---|---|
| Head (default) | Local desktop, debugging, demos | Yes, auto-opens the browser (see Web UI for details) | Method 1: From the project directory, run ./scripts/install-desktop.sh in a terminal, then double-click the desktop shortcut or search for "IO Gateway" / "IO Gesture" in the app menu to launch;Method 2: From the project directory, run ./scripts/run_gateway.sh in a terminal |
| Headless | SSH remote, systemd service, secondary integration | None | From the project directory, run ./scripts/run_gateway.sh --headless in a terminal |
For detailed startup methods, see the Startup section.
Startup
All startup methods use scripts/run_gateway.sh, which automatically loads the Python and ROS environment from bundle/.
Head Mode (Recommended)
./scripts/run_gateway.sh
-
Default URL: http://127.0.0.1:8080/
-
Optional:
-
Do not auto-open the browser (Web UI still available):
GATEWAY_NO_BROWSER=1 ./scripts/run_gateway.sh# or./scripts/run_gateway.sh --no-browser -
Desktop shortcut:
./scripts/install-desktop.shAfter installation, launch from the desktop or app menu by searching for "IO Gateway" / "IO Gesture".
-
Headless Mode
./scripts/run_gateway.sh --headless
-
On startup, the terminal shows:
[run_gateway] mode=headless API=http://127.0.0.1:8080/api/v1 WS=ws://127.0.0.1:8080/ws -
Accessing the root path
http://127.0.0.1:8080/returns a JSON guide instead of an HTML page. -
Quick headless verification:
# Health checkcurl -s http://127.0.0.1:8080/api/v1/status | python3 -m json.tool# Select hand model (example)curl -s -X POST http://127.0.0.1:8080/api/v1/hands/select \-H "Content-Type: application/json" \-d '{"hands": ["YourHandModel"]}'
Headless and Head share the same backend; the only difference is that Headless does not serve the HTML console or static assets.
Web UI
UI Overview
The frontend web UI is organized top to bottom as:
- Exoskeleton and dexterous hand configuration module.
- Exoskeleton and dexterous hand visualization module.
- System monitor module.
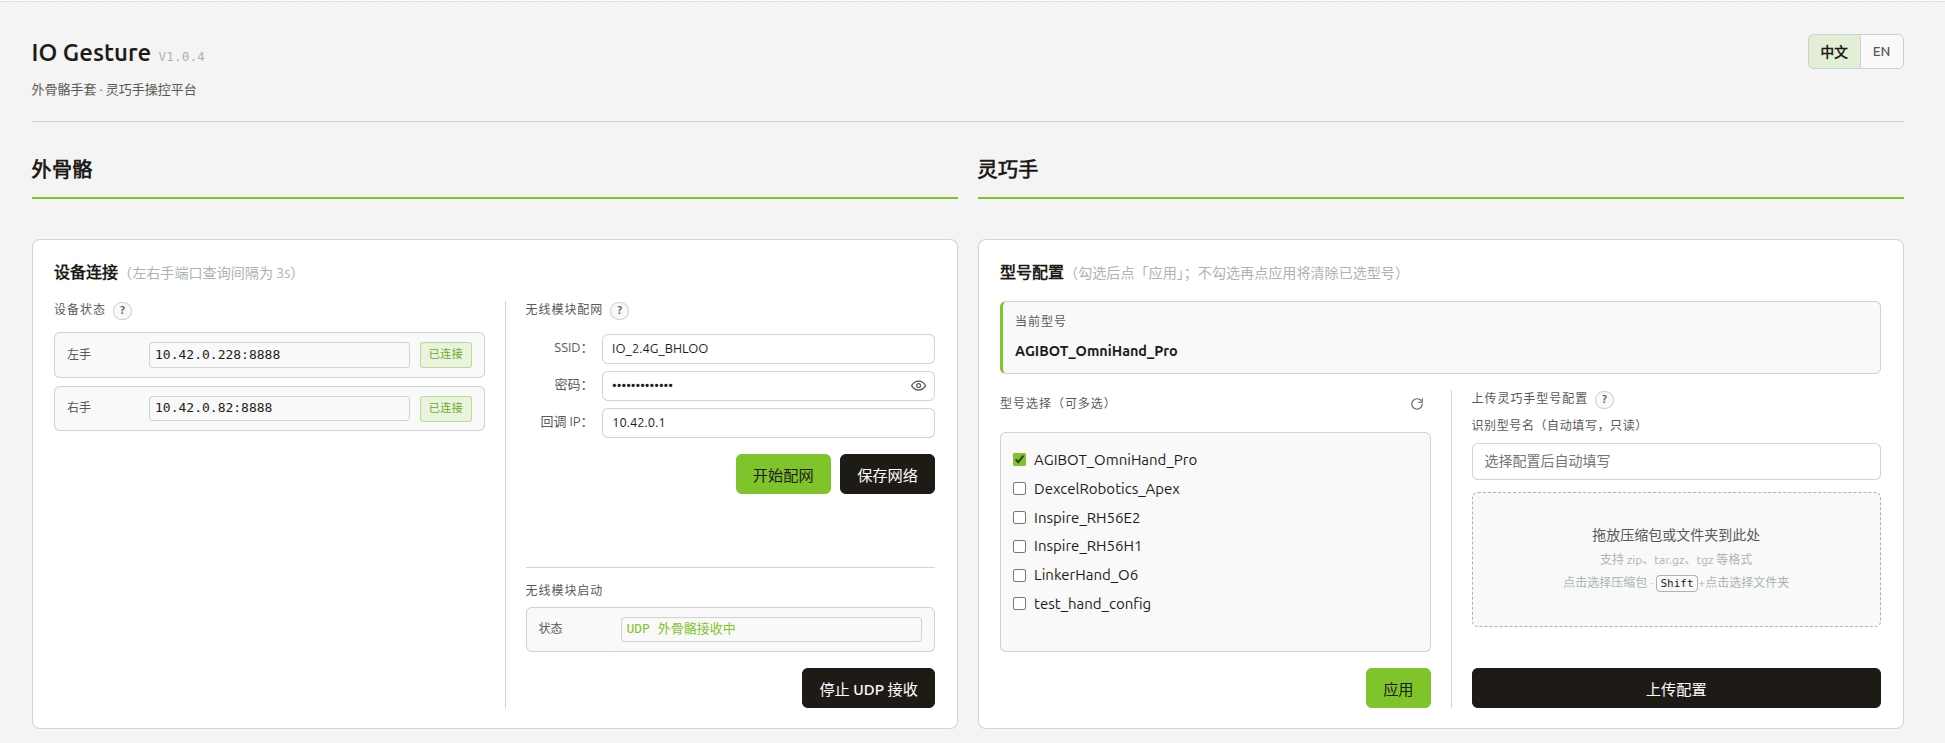
Exoskeleton and dexterous hand configuration module
Exoskeleton and dexterous hand visualization module
System monitor module
Exoskeleton and Dexterous Hand Configuration Module
Exoskeleton Connection and Configuration
Wired Connection
- Connect the exoskeleton glove to a USB port on your PC using the included USB C-to-A adapter cable. The software automatically detects the left/right hand connection status (refresh takes about 3 seconds).
- On success, the device status shows Connected along with port information.
Wireless Connection
- Plug in the included router to power it on.
- Connect your PC to the router's Wi-Fi (you can also connect the PC to the router via Ethernet).
- Set the PC's
IPv4address to10.42.0.2. - Connect the exoskeleton glove to the wireless module.
- Power on the wireless module: short press + long press the device button; release as soon as the battery LED blinks to power on. Wait until the wireless module LED blinks green.
- Click the "Start UDP receiver" button in the web UI and wait for completion.
- On success, the device status shows Connected along with port information.
Appendix: Wireless Module Provisioning Flow
The wireless modules are provisioned at the factory. This guide is only for reference when re-provisioning is needed; you can skip it otherwise.
The two wireless modules must be provisioned separately: complete provisioning for one module following the steps below, power it off, then provision the other. Once both are provisioned, you can power them on for use.
- Power on the wireless module:
- Short press + long press the device button; release as soon as the battery LED blinks to power on.
- Switch the wireless module to pairing mode:
- Step 1: While powered on: short press → long press 3 s (battery LED blinks once) → keep holding to 10 s (blue LED on) → release → device powers off;
- Step 2: Power on again: short press → long press 3 s (battery LED blinks once) → release → pairing mode (blue LED on).
- ESP provisioning:
- Power on the included router and connect it to the computer on which you want to run the IO Gesture program (to ensure successful provisioning, make sure the computer is only connected to this router during provisioning):
- Connect the computer to the router via Ethernet;
- Or connect the computer to the router's 2.4 GHz Wi-Fi band (e.g.
IO_2.4G_*****).
- Enter the router Wi-Fi SSID (name), password, and callback IP (
10.42.0.1). - Make sure that besides the above computer, at least one other device is connected to the router.
- Click "Start provisioning"; the software validates the callback IP (click "Save configuration" to persist the current network settings to a local config file);
- Watch the module LED: it should go from solid blue to briefly red, then solid green (or green blinking if an exoskeleton glove is connected).
- Power on the included router and connect it to the computer on which you want to run the IO Gesture program (to ensure successful provisioning, make sure the computer is only connected to this router during provisioning):
Appendix: Wireless Module Button Reference
| Function | Action |
|---|---|
| Power on | Short press → long press 3 s (battery LED blinks once) → release |
| Power off | Short press → long press 3 s (battery LED blinks once) → release |
| Check battery (powered off) | Short press |
| Enter pairing mode | 1. Powered on: short press → long press 3 s (battery LED blinks once) → keep holding to 10 s (blue LED on) → release → powers off 2. Power on again: short press → long press 3 s (battery LED blinks once) → release → pairing mode (blue LED on) |
Appendix: Wireless Module LED Reference
| State | LED |
|---|---|
| No Wi-Fi connection | Red solid |
| Listen / pairing mode | Blue solid |
| Wi-Fi connected, no device data | Green solid |
| Wi-Fi connected, device data active | Green blinking |
| Reading intrinsics | Blue blinking |
| Device discovered | Blue-green blinking |
Dexterous Hand Connection and Configuration
- Connect the dexterous hand to the PC and perform any necessary deployment adaptation.
- Upload the dexterous hand model configuration file:
- Drag and drop archives (zip/tar.gz/tgz, etc.) or folders;
- Or click "Upload configuration" and select from the file browser.
- Select the target dexterous hand model: click "Refresh model list" if the model is missing.
- Click "Apply model" to activate the selection.
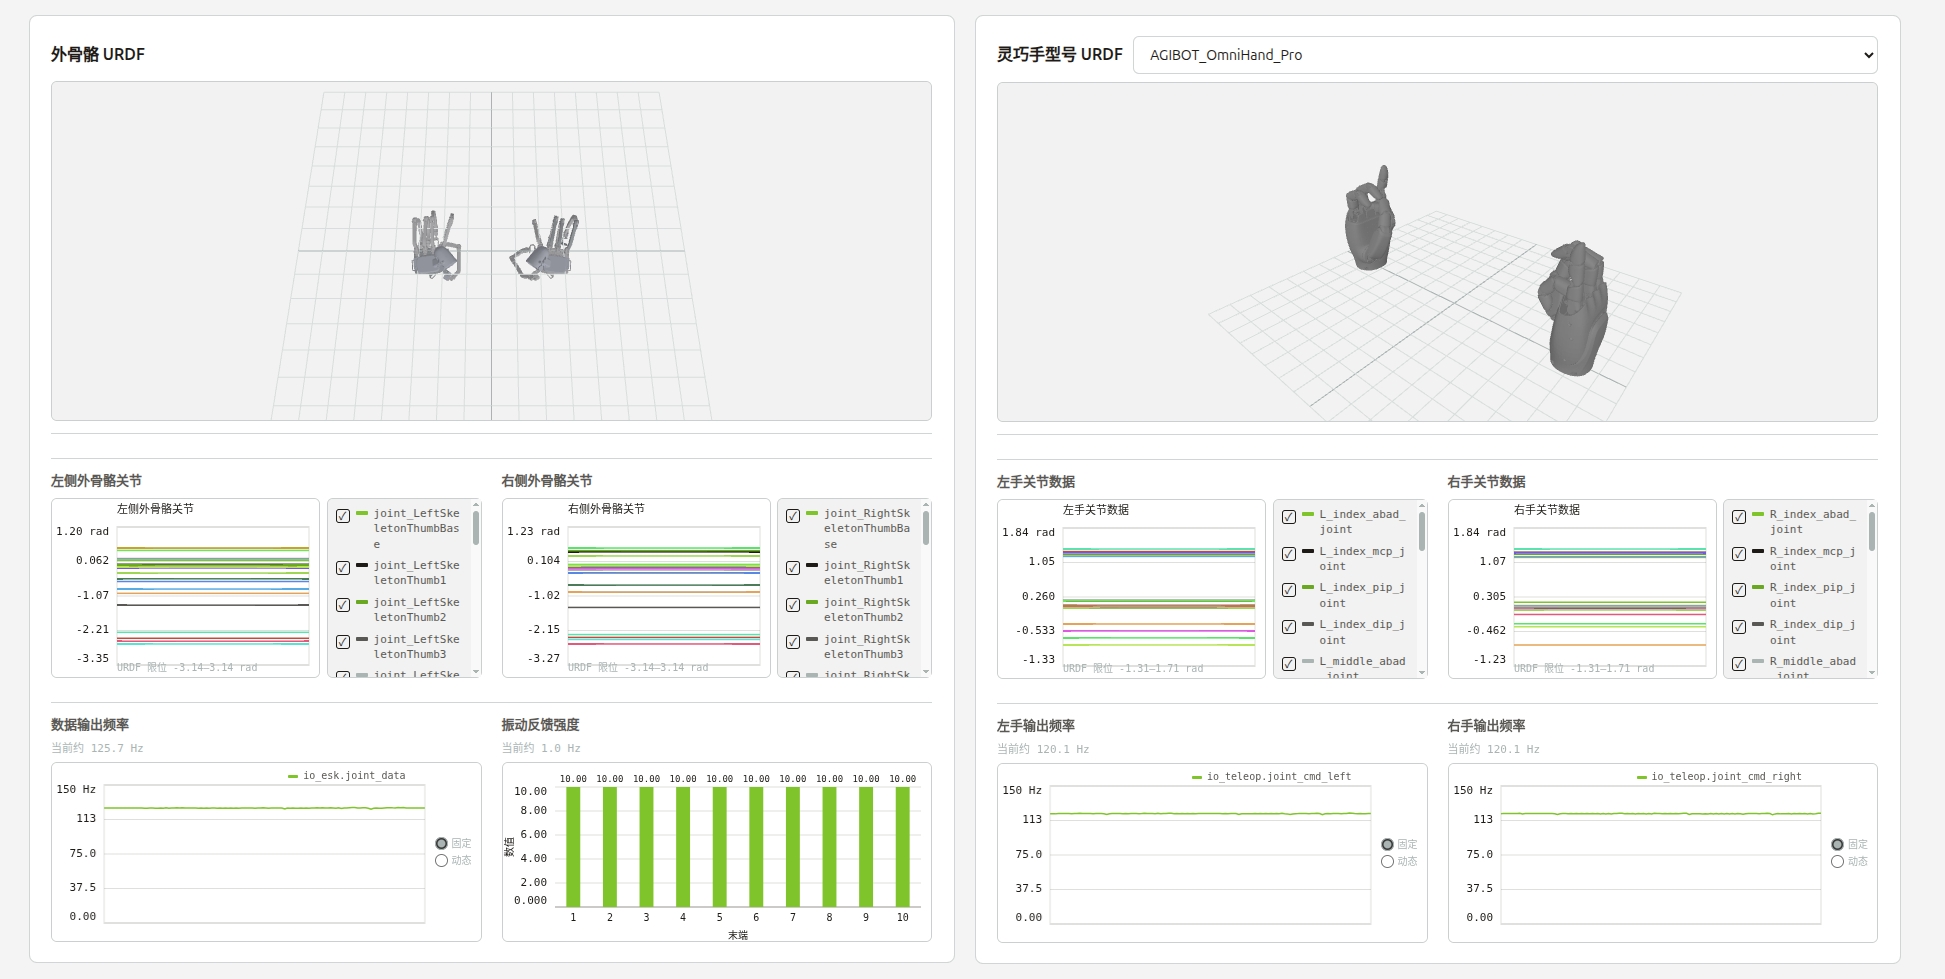
Exoskeleton and Dexterous Hand Visualization Module
Real-time Exoskeleton Motion Visualization
- Drag with the mouse to rotate; scroll to zoom.
Left/Right Exoskeleton Joint Data
- Shows
exo_jointvalues over time for each side. - Toggle series to display.
Output Frequency
- Shows
exo_jointoutput frequency over time. - Chart axis can be fixed or dynamic.
Vibration Feedback
- Shows
exo_vibrationintensity sent from the dexterous hand to the exoskeleton. - Endpoints 1–10 map to the 10 exoskeleton fingertips.
Dexterous Hand Visualization
Real-time Hand Motion Visualization
- Drag with the mouse to rotate; scroll to zoom.
Left/Right Joint Data
- Shows
cmd_left/cmd_rightvalues over time. - Toggle series to display.
Left/Right Output Frequency
- Shows
cmd_left/cmd_rightoutput frequency over time. - Chart axis can be fixed or dynamic.
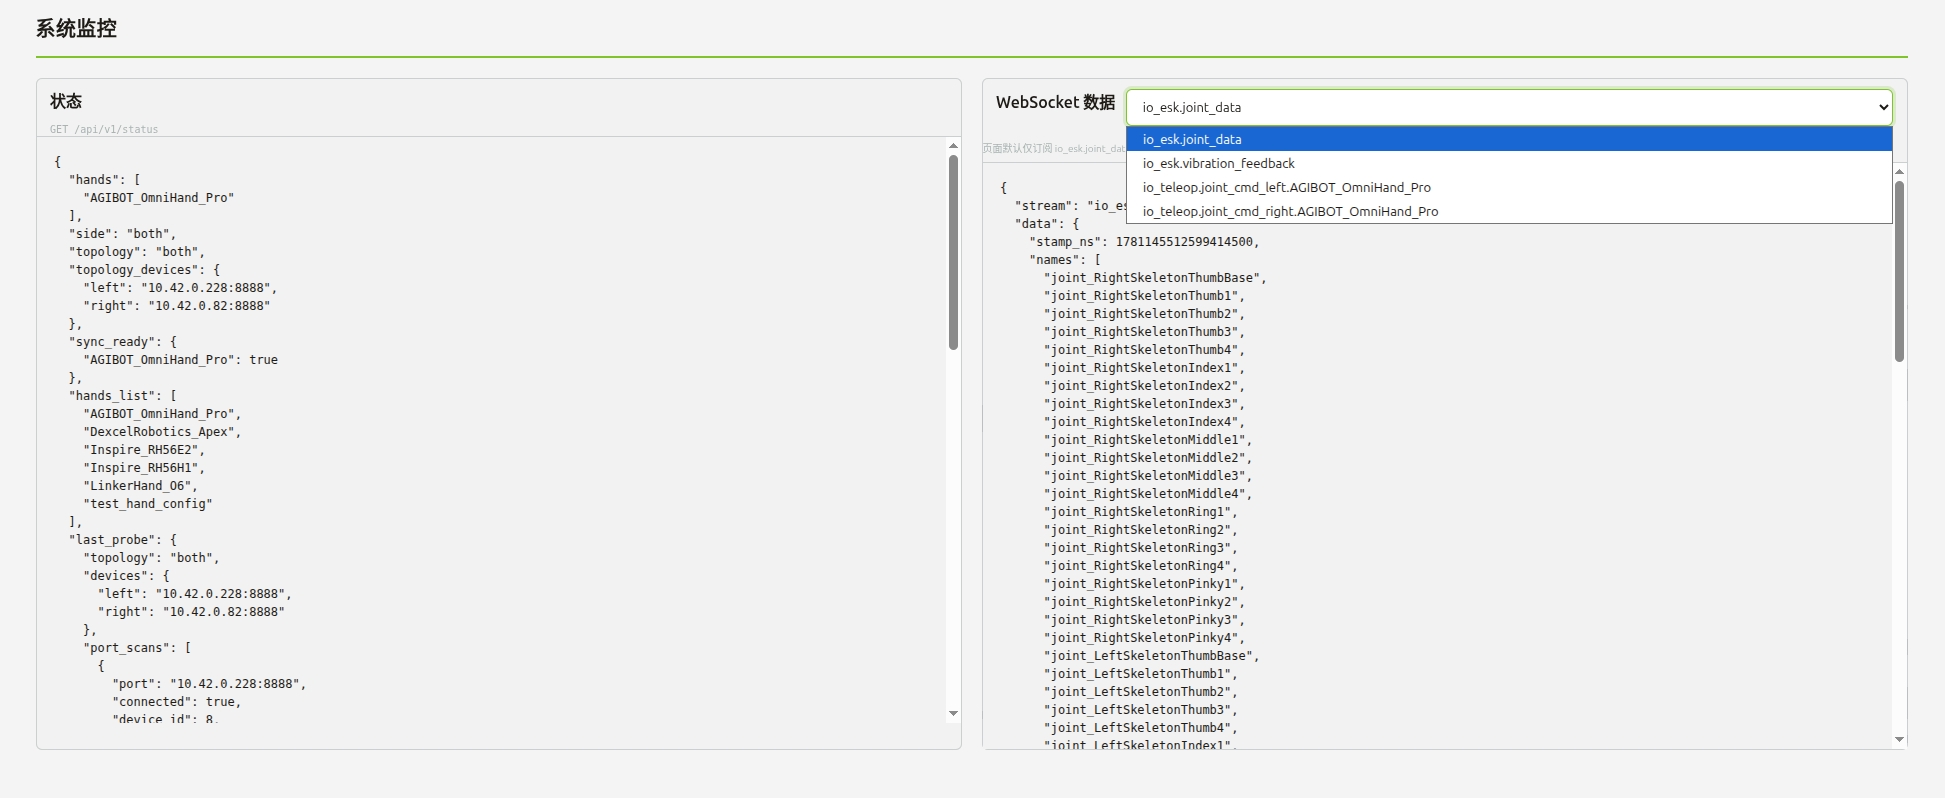
System Monitor Module
Status
- Live
/statusdata: runtime topology, hand model, side, subprocesses, ROS bridge, sync state.
WebSocket Data
- Live values for exoskeleton
exo_jointand applied dexterous handcmd_left/cmd_right. - Select streams from the dropdown.
Common Environment Variables
| Variable | Description | Default |
|---|---|---|
GATEWAY_PORT | Listen port | Reads listen_port from gateway.yaml (8080) |
GATEWAY_NO_BROWSER | Prevent auto-opening the browser in Head mode | Unset |
IO_EXOTRANS2HAND_ROOT | Project root directory | Parent of the script directory |
Example: run headless on port 9000:
GATEWAY_PORT=9000 ./scripts/run_gateway.sh --headless
Logs and Troubleshooting
| Type | Path |
|---|---|
| Gateway main process | logs/YYYY-MM-DD/io_gateway.log |
| Subprocesses | Per-component logs under logs/YYYY-MM-DD/ |
Common issues:
-
Startup failure / Python not found
Ensurebundle/opt/python/bin/python3exists and is executable; do not delete thebundle/directory. -
ROS-related errors
Ensure/opt/ros/humble/setup.bashexists; runsource /opt/ros/humble/setup.bashmanually in the terminal and retry. -
USB exoskeleton not detected
Check whether the user is in thedialoutgroup; whether udev rules are installed; whether the device is held by another process. -
Browser does not auto-open in Head mode
Manually visithttp://127.0.0.1:8080/; or setGATEWAY_NO_BROWSER=1and open it yourself. -
Wireless UDP fails to start
Ensure the host has a10.42.0.*subnet address configured. -
No dexterous hand model available
Upload a configuration package via the web console, or place a valid hand model directory inconfigs/end_tools/<model_name>/. -
UI lag / visualization frame drops / slow overall response
Usually due to insufficient CPU. See Device Performance Requirements. Switch to./scripts/run_gateway.sh --headlessto reduce load, or close unnecessary browser tabs and other CPU-intensive programs.
If you encounter other issues, contact technical support with the following information:
- OS version and hardware connection method (USB / UDP)
- Startup command (head or headless) and full terminal output
- That day's
io_gateway.logand related subprocess logs underlogs/